This is the manual for versions 1.x. Manual for version 2 is
here.
Contents
Chapter 1: Introduction
Before you start
Video Enhancer is a program that allows you
to increase resolution of video using Super Resolution method. Super
Resolution is a smart video upsizing algorithm which uses information from
neighbor frames to upsize current frame. It accumulates information,
so the more sequential frames are processed, the better quality you
get. If picture in your video doesn't change too fast,
then information from several frames can be added to create a picture
of a bigger size, revealing details which would otherwise remain hidden.
No algorithms of ordinary image resize/resample can provide this quality
just because there's not enough information in one frame.
Video Enhancer also allows you to
use more than two hundred of
VirtualDub filters
to do everything you want with your video: deinterlacing, denoising,
deblocking, color correction, deshaking, sharpening, visual effects
etc. But unlike VirtualDub, in Video Enhancer all filters, coders
and decoders work simultaneously in separate threads saving your time.
This tutorial will help you
to benefit from every opportunity offered by Video Enhancer.
Registration
Video Enhancer
is a try-before-you-buy program. You can use it free of charge for 30
days without functional limitations. In order to use it longer you must
purchase it.
Doing so you will receive a registration code which must be entered
in registration dialog offered by Video Enhancer at start.
Definitions
Artifact - a visible defect in a digital
photo or video picture
Codec - a third-party system component that compresses and/or decompresses data
Compression -
lossy or lossless process of encoding information using fewer bits
Deblocking
- correcting blocks in decoded video in order to improve visual
quality and prediction performance by smoothing the sharp edges which
can form between blocks when
block coding techniques are used
Deinterlacing -
converting interlaced
video, like common analog television
signals, into a non-interlaced form.
Denoising -
removing noise from a video.
Noise is an unwanted distortion of data, including false contouring
appearance, wide horizontal noise strips typical for old VHS, film artifacts
- dust or dirt; snow, multiple small dots etc.
Deshaking - removing shaking from a video (typical effect for home camera shooting).
DirectX (Microsoft DirectX) - a set of system components providing
application programming interfaces (APIs) for handling tasks related
to multimedia,
especially game programming and video, on Microsoft platforms
Filter - a program component used to modify the content of video
Multithreading - parallel (simultaneous) execution of several pieces of program in
different threads
Uprezzing - increasing video resolution
VirtualDub -
a powerful video editing application with a collection of more than 100 video filters
System requirements
A Pentium Pro or higher, 64 MB of free RAM, Windows 2000/XP/2003/Vista/7, DirectX 9 or higher.
Chapter 2: Interface overview
Video Enhancer provides two modes of user interface: Simple and Advanced. Simple mode
opens by default when Video Enhancer starts for the first time.
| Feature |
Simple |
Advanced |
| Select input
video file(s) |
+ |
+ |
| Select output
video file(s) to be created |
+ |
+ |
| Select codec
to be used for video and audio compression |
+ |
+ |
| Preview input
file |
+ |
+ |
| Launch video
file processing |
+ |
+ |
| Preview output
file |
+ |
+ |
| Wizard |
+ |
+ |
| Increase
video resolution to any desired width and height |
+ |
+ |
| Setting scale
size to keep or edit aspect ratio while increasing resolution |
- |
+ |
| Create a
sequence of filters to be applied to video one by one (including any
number of Super Resolution steps) |
- |
+ |
Simple mode
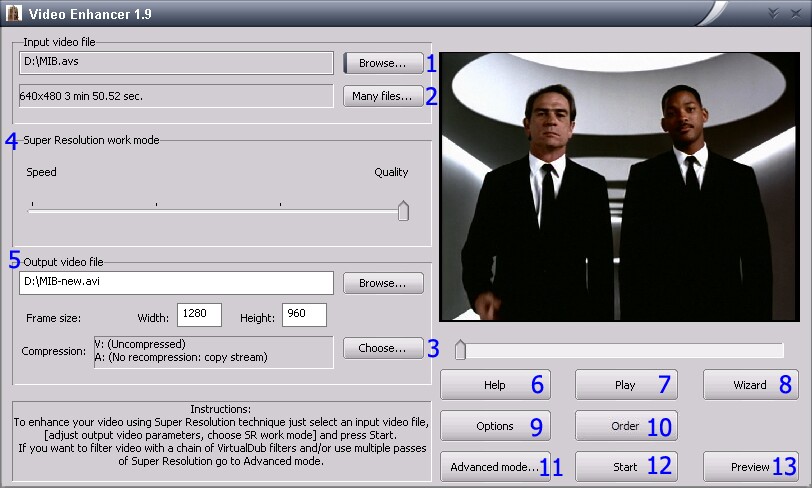
| 1 |
Click to select input or output file |
| 2 |
Click to select more than 1 input file |
| 3 |
Click to select video (V) and audio (A) compressor from the list |
| 4 |
Select variant which suits your
needs best: either maximize quality of the output file but prepare to
wait longer, or have a speedy processing with less impressive result |
| 5 |
Set in pixels the frame size
you want to obtain in output file(s) |
| 6 |
Approach user's guide from
Video Enhancer |
| 7 |
Play the input file |
| 8 |
Launch the wizard - an illustrated guide to quickly choose filters and clean your video |
| 9 |
Open Options window
|
| 10 |
Purchase Video Enhancer
|
| 11 |
Switch to Advanced mode |
| 12 |
Start video processing (be
sure to set all parameters first) |
| 13 |
Click to see fully processed video and compare with original without saving to disk |
Advanced mode
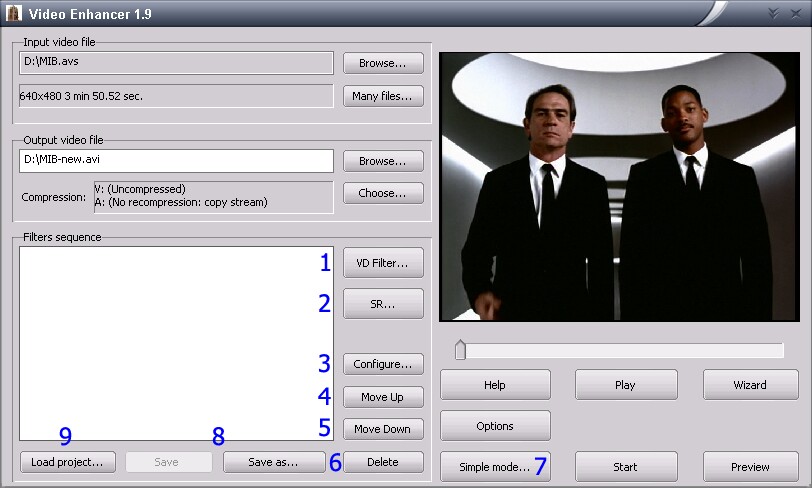
This table covers buttons which
are NOT present in Simple mode:
| 1 |
Select a VirtualDub filter and add it to the processing sequence. |
| 2 |
Add Super Resolution to the sequence and configure it. |
| 3 |
Change settings of currently selected filter. |
| 4 |
Move selected filter up in the sequence to make it applied earlier. |
| 5 |
Move selected filter down in the sequence to make it applied later. |
| 6 |
Delete selected filter from
the sequence. |
| 7 |
Switch to Simple mode. |
| 8 |
Save current project. |
| 9 |
Load a previously saved project. |
For power users who want to use Video Enhancer from shell scripts, it also provides a
command line interface.
Chapter 3: Using Video Enhancer
Selecting input and output file(s)
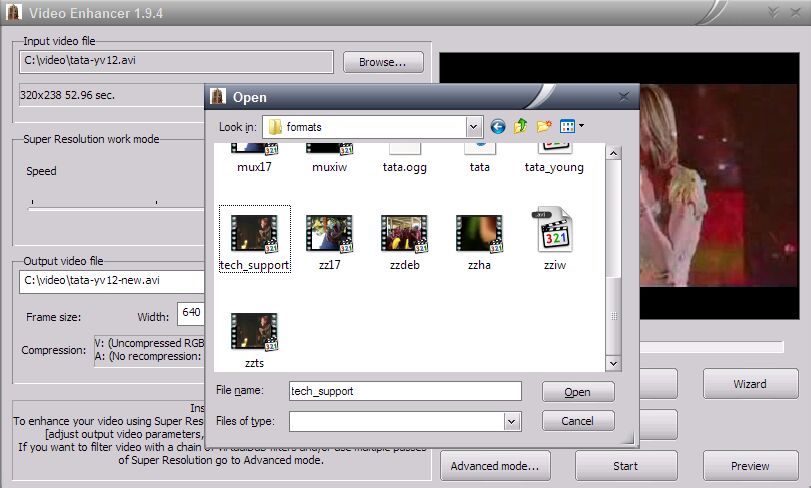
- Processing a single file:
- To select input file: Browse (next to "Input video file" box)>Select file>Open.
- To look through
input file: the first video frame of selected file appears in the monitor
area on the right. Just drag the pointer under monitor area to see other
frames or press Play to start playing it from current position.
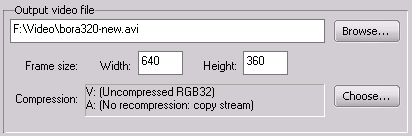
- Default output file:
after input file was selected, the default output filename is original
filename plus the word "new" preceded by a dash. For example,
if your input file name is bora320.avi, than the default output file
is bora320-new.avi.
- To set output file:
Browse (next to "Output video file" box)>Fill "File name"
box>Save. Or just edit filename in the box.
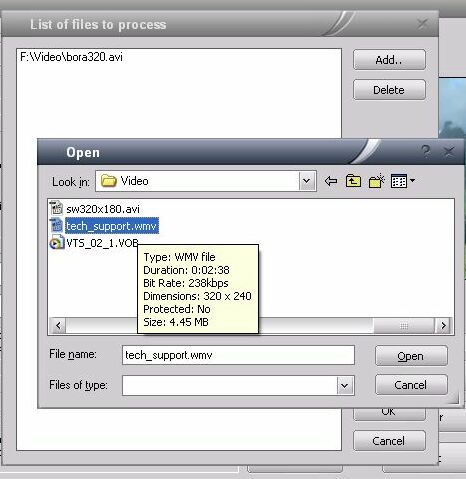
- Processing several files:
- To add file: Many
files>Add>Select file>Open>OK or just drag the files to the list window.
- To delete file:
Many files>Select file>Delete>OK
- To select several
files: hold Ctrl on your keyboard while selecting.
After the list of files was
created, the "Input video file" box shows the first filename in
your list plus number of other files selected:
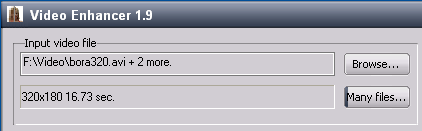
The lower box indicates resolution
and duration of the first file in your sequence. Click "Many files"
to view and/or edit your list of files.
It is not recommended to apply sequence of filters to several files which differ in original
resolution. You can not edit output file
names separately, all but the first one will be named by adding "-new" to the end.
Input and output formats
Video Enhancer reads any video
file that can be played by Windows Media Player. By default this is
AVI, WMV, MPEG and ASF files.
If any problems arise with opening or processing a video file in Video Enhancer,
in most cases they are caused by a lack of proper codec. It is highly recommended
to install K-Lite Codec Pack,
full verwion. See detailed instructions how to
install and tune video codecs properly.
The output video is stored
in AVI file. You can use any video codec to compress output video -
any DirectShow, DMO and Video for Windows codecs. By default audio stream
(if present) is stored to the output AVI without changes. But you can
choose to recompress audio with any audio codec installed.
Super Resolution work modes
There are several super resolution
work modes to choose from in Video Enhancer. Video Enhancer uses neighbor
frames to upsize a current frame with maximum quality. This requires
multiple calculations to be performed, so prepare for 95-100% CPU usage.
By changing how precise Video Enhancer searches for motion one can
choose between quality and speed. The more precise motion search is,
the slower it works but the better is quality. You can just drag a slider
between speed and quality ends. The fastest and the slowest modes differ
in speed about 2 times.
Setting desired resolution
This couldn't be easier:
just set width and height in respective boxes of the main
window.
Original width and height are
indicated under input file name. You can specify desired size either in pixels or in percents of original. Type in % symbol
to switch to percents. Delete it to switch back to pixels.
See section "Scaling" below to
master more complex uprezzing technique.
- Click SR button
- Set output size:
use either pixels or percents. Type % symbol to specify size in percents of original. Delete % symbol to switch back to pixels.
- Set scaling parameters
(see "Scaling" for details)
- Select qualitative
or speedy mode (see "Super Resolution work modes")
- Click OK
Scaling
There are actually two frame
sizes that Video Enhancer uses to resize your video: output width and
height and actual frame size to scale to (see panda scheme on the screenshot below).
Suppose you have a video 320x240
lines and want to make it 720x480 (NTSC). If you just scale 320x240
to 720x480, the image will become wider, all circles will become ellipses
and all people will look fat. Simply because 4:3 proportion (320x240)
does not equal 3:2 proportion (720x480). In order to preserve aspect
ratio and make video 480 lines high, output size must be 640x480 (to
keep the same proportion 4:3).
But you wanted 720x480! In
this case you just set output size to 720x480 and size for scaling to
640x480:
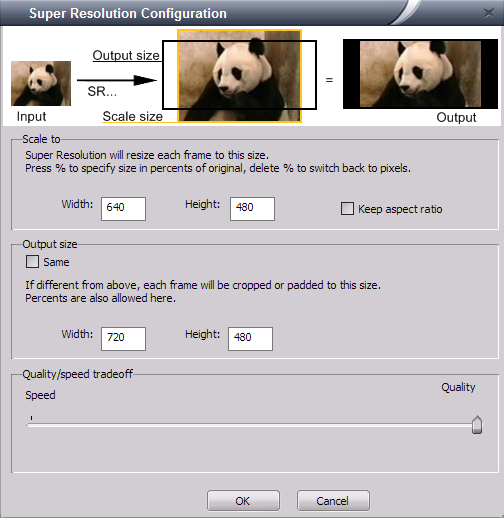
Video Enhancer will scale your
video to 640x480 and add black borders to right and left to make output
width 720. Or, you can set scale size to 720x540 (still 4:3) and output
size 720x480. Then Video Enhancer will scale your image to 720x540 and
keep 480 center lines, cutting top and bottom. Of course, if you want
to change aspect ratio (to make fat people look less fat, for example)
you can set any values of width and height. If you do not like typing in pixels, use percents instead. Type % in width or height box to specify size in percents of original. Delete % to switch back.
In the Simple mode you enter
just one size - output size. Video Enhancer preserves aspect ratio and
scales your video to fit output size (no cutting) adding black borders
if needed. In the Advanced mode you can set both sizes manually.
If you want to increase your
video resolution more than 2-3 times, you will obtain better quality
by using several steps of Super Resolution. Just add several SR steps
to the filter sequence, each time doubling the video resolution, and
setting desired resolution on the last step.
Choosing a video codec
1. What is a codec
To understand what
a codec is you can read this Wikipedia article:
http://en.wikipedia.org/wiki/Codec
So, a codec is a piece of software that can encode and decode video.
When it encodes video, it gets uncompressed video (sequence of images)
on its input and outputs some data, usually much smaller in size. That's
the main purpose of the codecs - make video size in bytes smaller. When
it decodes video, it takes that compressed data and outputs sequence
of uncompressed images.
Some video editing/playing software contains certain codecs built-in,
but most software doesn't - it uses codecs made by third-party developers
and separately installed in your system. The system usually provides
some means to find installed codec and use it for compressing and decompressing
data. Each codec knows how to compress data, how to decompress data
created by itself (but not by other codecs), but codecs do not know
how to store this data on disk.
When you write compressed video to disk, it's written in one of container
formats such as AVI, MOV, MP4 or something else. Each container format
describes how to save chunks of compressed data and information about
it, for example a little code (i.e. FourCC) that signals about compression
method. When this file is then read, that meta information about compression
method is used to find a codec that will decompress the data. So, knowing
how to read AVI files is not enough to decode the video - a proper codec
is essential.
Some compression methods are described in some standards (like MPEG4,
for example). So many different codecs may implement such compression
algorithms and they are often interchangeable. For example, DivX and
XviD are both implementations of MPEG4 compression method, so video
compressed by one of them can be decompressed by another one or even
a third codec that knows how to decompress MPEG4. But some codecs have
their own unique compression methods and video compressed by such codec
can be decompressed only by the same codec.
2. Lossy and lossless
compression
The task of a video
codec is to compress video so it takes less space on disk or downloads
faster. This can be done in two ways: it can try to compress the video
without losing any information at all - like zip compresses your files
without changing them. Such compression is possible but it's quite limited
- most lossless codecs provide small compression ratio, like 1:3. And
you cannot control how big the result will be - it totally depends on
the algorithm and the source video. But they guarantee that decompressed
video is exactly the same as the source.
Another way is to allow losing some information. Most video codecs go
this way, they throw out much of original information but in a way not
very noticeable by the eye. In this case decompressed video is not the
same as original - it's always of lower quality. But now you can control
how much information will be thrown away and so control how large the
result will be measured in bytes. Amount of bytes (or bits) per second
of video is called bitrate. The more the bitrate is, the less information
is lost, the better is quality. The lower bitrate, the lower quality.
And remember that each time you compress video by a lossy codec, the
quality gets worse.
3. What kind of codec to use
So when selecting a
codec you need to decide first which kind to use - lossless or lossy.
If you need just to temporary store video for further editing and you
need to keep maximum quality, then a lossless codec is what you need.
If, otherwise, you need to create a file which will only be played but
not edited, and you want it to fit in limited size (like CD or DVD),
then you need a lossy codec.
4. Choosing a lossless codec
Lossless codecs differ
by availability (some are Windows-only, some are free, some are commercial),
by speed and by average compression ratio. Some codecs are very powerful
in compressing the data, but unusably slow. Some are very quick but
compress poorly. You can find a big and detailed comparison here:
http://compression.ru/video/codec_comparison/lossless_codecs_2007_en.html
Video Enhancer author's personal choice is Lagarith, it's quite fast
and provides reasonable compression.
5. Choosing a lossy
codec
Lossy codecs also differ
by availability (some are Windows-only, some are free, some are commercial)
and speed, but they also differ by quality/compression ratio. This means
that every lossy codec can compress video to almost any given size,
so the compression rate is the same. But video compressed to the same
size by different codecs has different quality. And again, usually the
better this quality/compression ratio is, the slower is the codec. Nowadays
best quality/compression ratio is in H.264 implementations, but the
speed is usually bad: they need a very powerful CPU to decompress (play)
the video and huge amounts of time to compress it.
You can find big detailed comparison here:
http://www.compression.ru/video/codec_comparison/h264_2010/
The next level is MPEG4 implementations, they provide a bit lower quality/compression
ratio, but fast enough for modern PCs.
DivX and XviD are most commonly used (the first is commercial and the
second is free) and they are our codecs of choice for lossy compression.
If you install the codec pack we recommend,
you'll have a good choice of video codecs to use.
Audio codec
For audio we recommend using
AC-3 ACM codec.
To install it download the archive, unpack it to any folder, go to x86 subfolder, right click
the .inf file and select Install.
Wizard
This useful feature helps you
to quickly diagnose which distortions your video file is subject to and it will choose some filters for you.
Select an input file (Browse>Choose file) and follow Wizard's instructions
checking the boxes as you analyze your file:

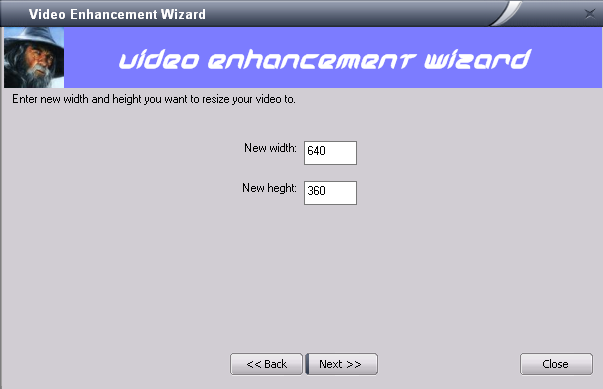
Wizard asks you to evidence
interlacing, blocking and noise in your video. This will take a few
seconds. Then, choose a new resolution for your video (see "Setting
desired resolution" for more details):
After new parameters are entered,
you can choose a video and audio compressors (read more in "Choosing
a video codec").
Wizard will probably suggest
you to switch to Advanced mode to apply denoising or deinterlacing or
deblocking filters and clean your video. Just do so; Video Enhancer
will create a filter sequence by itself.
Filtering your video (Advanced mode)
In the Advanced
user interface mode you can create chains with any number of VirtualDub
and Super Resolution filters to be applied to your video. It means you
can filter your video before resizing, after resizing, between or even
instead.
You can use over a hundred
of VirtualDub filters to alter your video: deinterlace, denoise, deshake,
do color correction, apply some visual effects and much more. If you
have VirtualDub installed, then Video Enhancer will probably find your
filters automatically. You can see list of filters that work in Video
Enhancer at /VideoEnhancer/filters.html.
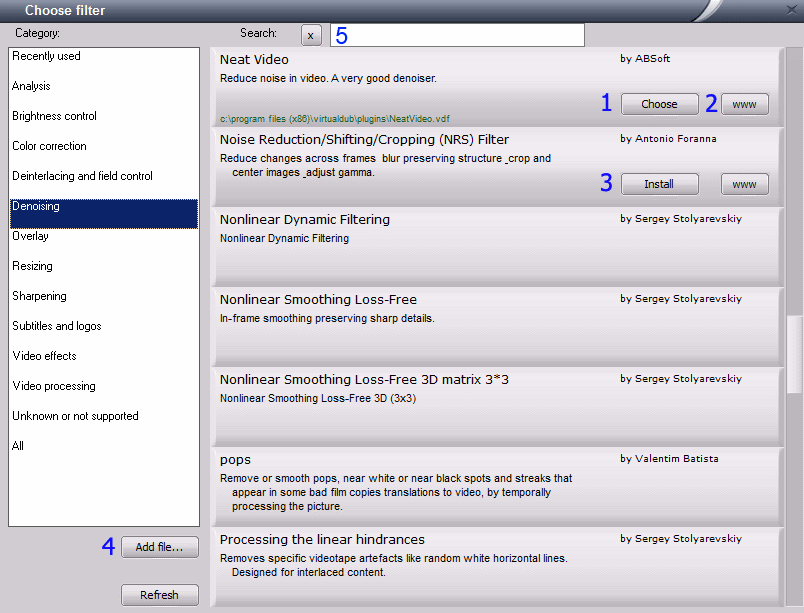
Video Enhancer will automatically detect and make use of any already installed VirtualDub filters.
You may also easily install any additional filters.
| 1 |
You can choose and make use of any already installed filters. |
| 2 |
Opens a link in your web browser for additional information about the filter. |
| 3 |
Automatically download and install the filter. |
| 4 |
Manually install any additional .VDF filter. |
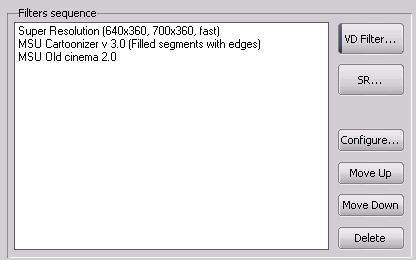
You can change VirtualDub filter
settings (configure) as desired when adding to the sequence and later
by pressing CONFIGURE button. When you are happy with the settings,
click OK in the filter configuration dialog box.
You can easily edit the filters
sequence:
- To change filters
order: select a filter to be moved and click MOVE UP and MOVE DOWN
- To delete filters
from the sequence: click DELETE
- To add new filters:
click VD FILTER
Options
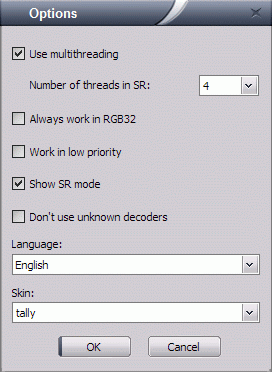
Use multithreading
In Video Enhancer all filters, coders and decoders can work simultaneously
in separate
threads. For example, if you process your video with two filters, then
at the time coder compresses the first frame second filter is already
processing second frame, first filter is processing third frame and
decoder decompresses fourth frame. Simple test
with processing DV video with 3 filters and compressing it with XviD
showed 1.9 times higher speed than VirtualDub on Dual Core AMD Opteron.
Just check "Use multithreading" box to optimize parallel processing.
Number of threads in SR
Here you can select number of parallel threads used by one instance of super
resolution engine. Usually optimal value here is the number of logical CPUs
of your PC, i.e. total number of cores and hyperthreads. In Windows up to 7
this is the number of CPU graphs you see in Task Manager.
In Windows 8 Task Manager
shows a single graph of CPU utilization but tells number of "Logical processors"
below.
Always work in RGB32
Since version 1.9.4 super resolution can work in two different colorspaces:
RGB32 and YV12, and in 1.9.9 one more was added (YUY2).
Previous versions worked only in RGB32.
YV12 is an uncompressed video format where luminance is stored in full resolution
and two color components (chrominance) are stored in half resolution, so it is
12 bits per pixel. Most video codecs internally work in this format.
When Video Enhancer sees that your video file can be naturally decoded to YV12
and you don't apply any VirtualDub filters before Super Resolution, it uses YV12
version of SR. It works approx. twice faster than RGB32 version. If you check
"Always work in RGB32" checkbox, VE will always use RGB32 version of SR.
Work with low priority
When Video Enhancer is processing a file it may load your CPU to 100% and in some cases
this causes other applications to slow down. If you check this option, VE will work
with lower than normal priority and will not affect other applications while still
utilizing as much CPU as possible.
Show SR mode
When this option is enabled, Video Enhancer will show if it's working in RGB or YV12 mode during processing.
Don't use unknown decoders
In short:
Use for opening video files LAV splitters and decoders that Video Enhancer downloads
itself, or, if they can't handle your video file, try a few well known decoders but
don't let the system select decoders, i.e. don't rely on DirectShow default
choice of codecs. Use this option in case of having trouble opening or processing
some files.
Longer story:
To process a video file Video Enhancer needs a splitter to read video and audio streams
from it and a decoder to get uncompressed video from a compresseed video stream.
Earlier versions of Video Enhancer delegated the choice of splitters and decoders
to operating system: installed decoders register themselves in the system with some
priorities and the one with highest priority is selected to try decoding first.
Since some apps tend to install their own codecs and register them with high priorities
this sometimes leads to unstable work of apps like Video Enhancer. That resulted to
crashes and general inability of Video Enhancer to open some files. Situation changed
in version 1.9.9, starting from this version Video Enhancer first tries splitters
and decoders it knows well and only if they fail it tries other decoders installed
your system. One of the best open source splitter/decoder set these days is LAV,
and if Video Enhancer doesn't find it in your system and no suitable decoder is found
for a video file, it may suggest downloading LAV automatically and using it locally.
But if you had some older version of LAV installed or some other decoder seemed to
handle the video file, then it was used even if Video Enhancer didn't know this
decoder. Starting from version 1.9.10 we have this new option which tells Video Enhancer
to only use LAV decoders it downloads itself or a couple of well known codecs but
never trust the system to choose decoders and splitters. This will help in cases where
some bad codecs are installed and registered as default ones, which previously
caused troubles opening some videos.
Language
Since version 1.9.4 Video Enhancer's interface can switch between different languages.
All language data is stored in text files with .lng extension. You can edit them in
Notepad. Anyone can create these translations files and add new languages.
VE will search its folder for .lng files and let you choose a language.
Skin
Here you can select how VE will look like. There are different looks available for your choice.
If you don't want any unusual skins, just select "No skin" and default Windows look will be used.
Preview
Preview option allows you to
see the output video resulting from parameters you have set and compare
it with original input file (without saving output file). It is recommended
to always preview at least several seconds of output file before you
start processing of a large video in order to avoid common mistakes
(scaling-related, for instance).

- Browse>Select
input file (or Many files>Select input file(s))
- Set Super resolution
mode ("better quality" or "better speed")
- Set desired resolution
for output file
- Set scaling parameters
(available from Advanced mode only)
- Create filter chain
(available from Advanced mode only)
- Click Preview.
Processing live preview
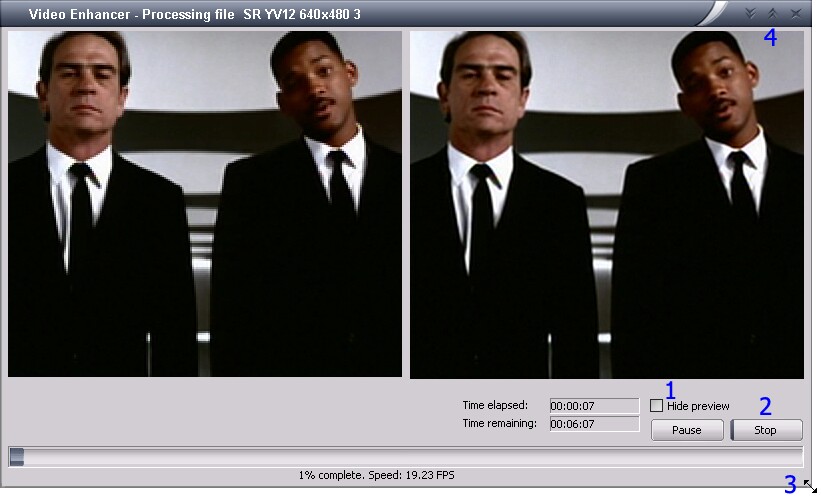
During video processing, you will see live preview of your video.
| 1 |
Disable the live preview. Video Enhancer will use less memory. |
| 2 |
Stop current processing. The aborted file will still be playable. |
| 3 |
Resize the processing window. The live preview will be resized accordingly. |
| 4 |
Maximize the processing window. |
Processing time
How long will it take to upsize
your video and clean it with selected filters? There are a lot of parameters
to influence the processing time, including original and final video
resolution (width and height), available CPU usage, filter features,
original file size etc. It is recommended to end CPU consuming tasks
(check in Windows Task Manager>Processes) before you start processing
a large file in order to speed up. Once you have set super resolution
parameters and selected the filters, remaining and elapsed time are
indicated while processing is in progress (in Preview mode as well).
If you feel like changing the settings, just press STOP and modify the
data accordingly.
Finally: uprezzing your video
- Select input file
- Set output file
- Choose video and
audio compressor
- Select "better
speed" or "better quality" super resolution work mode
- Set new resolution
- Set scaling parameters
(Advanced mode only)
- Create sequence
of filters (Advanced mode only)
- If you want multithreading,
check it
- Preview output to
control your settings
- Start processing
by pressing START button
Command line interface
You can use Video Enhancer in batch files using its command line interface.
You can either just use Super Resolutiuon resizing (by setting desired resolution with -d option)
or provide a file name of a previously saved Video Enhancer project (where a sequence of filters
and their settings are described) to apply filters from this project.
Parameters:
- -i infile - specify input file. Use double quotes (like "...")
for filenames that include spaces.
- -o outfile - specify output file,
- -d width height - destination video size, or alternatively
- project_file.vep - specify a Video Enhancer project file (created in GUI mode)
to apply filters from,
- -vc codec - set name for video codec. First codec which name
includes substring you specify here will be used. So you don't need
to specify full name of the codec. If this parameter is not set, uncompressed
RGB32 video will be stored (huge size)!
- -ac codec - set name for audio codec. If this parameter is not
set audio will be copied without recompression.
- -vlist -
output list of video codecs that can be used. All output is written
to text file ve.txt in the current folder.
- -alist -
output list of audio codecs.
- -fast - use
fast mode of super-resolution. If this parameter is not set, a slower
high quality mode will be used by default.
- -nomt - do
not use multithreaded processing.
Examples:
A. Show all available codecs (output goes to ve.txt):
VideoEnhancer.exe
-vlist -alist
B. Resize a file "176.avi"
to 1920x1080 and compress result with Huffyuv codec:
VideoEnhancer.exe
-i 176.avi -o "Upsized 176.avi" -d 1920 1080 -vc Huff -fast
C. Process file "176.avi" with a sequence of filters described in a project file
project.vep and compress result with Huffyuv codec:
VideoEnhancer.exe
-i 176.avi -o "Processed 176.avi" project.vep -vc Huff -fast
Chapter 4: Troubleshooting
XviD compression doesn't work.
In XviD version 1.1 to get
it working one needed to change one option in Xvid's parameters (this
needs to be done just once). When you choose Xvid for compression in
Video Enhancer, press "Configure", then "Advanced options",
"Debug" and switch off "Display encoding status".
After you've done it once, Xvid will work in VE.
Can't load FLV video
To be able to work with FLV video you can install K Lite Codec Pack.
Follow these instructions to solve most
problems with video codecs.
Processing does not start
To get the problem solved you need to answer 3 questions:
1) Can VE play the file in the main window when you open your file?
If no, you seem to lack a codec for this kind of files. We recommend installing K-Lite Codec Pack (see link above).
it contains necessary codecs to open 99% of files. When installing be sure you check the points regarding
FLV, FLV1 and VP6 (install FLV Splitter and set ffdshow to decode FLV1 and VP6 video).
In other points about DivX, XviD, MP3 etc we recommend not to use ffdshow and use original codecs since
ffdshow is not very stable.
2) Can VE process your file in Preview mode?
Open your file in VE, choose what you want to do with it (e.g. resize with SR, process with some filters) and press Preview.
If preview does not start and shows some errors, this means the problem is with the decoder compatibility.
You can try installing different codec for this kind of files or report the problem, read below how to get more details.
If preview is ok, then next question:
3) Can VE process your file in normal mode - writing output to disk?
If processing doesn't start and shows some errors, then probably you chose a bad codec for compression, try selecting another one.
If processing doesn't start but doesn't show any errors either - just sits still, it means your codec wasn't
configured properly, for example, see topics about XviD and DivX in the
FAQ.
If you couldn't find the solution yourself, you can report the problem.
Since there are dozens of different codecs and thousands combinations of their interactions,
the more information you provide, the more chances to get it working:
Since version 1.9.1 Video Enhancer allows starting a program in debug mode in order to create
a bug description. Open Video Enhancer folder in Program Files and start
VideoEnhancerDebugMode. Then try to process your file as you wanted.
At the same directory where you told it to write output file it will
create a .txt file with the name of your output file which will contain
list of components used in processing, including decoding and encoding
codecs and all intermediate filters. Please provide contents of this
file when reporting an error.
Frequently Asked Questions & Troubleshooting online
|